

ProductsToday, we are going to talk about the installation process of Hanging sliding door, as well as the size of the track groove and the size of Hanging sliding door.
Why can Hanging sliding door effectively secure the door panel? Actually, this type of door has many advantages. Because there is no door frame, it reduces the heaviness in both visual perception and force application. There is no sound produced by the door frame, achieving silent sliding and pulling, enhancing the aesthetic appeal, and it is also favored by the public. It is very suitable for use as a kitchen door. Let me give you a brief introduction.
First, pre-installation preparations
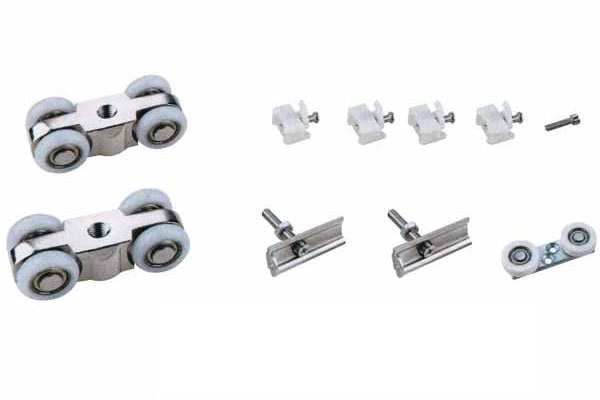
Material preparation: Gather all necessary components such as top rails, pulleys, hangers, rotatable shafts, a few screws, and the door panels to be installed.
Worksite confirmation: The main structure of the door frame must have been completed and passed the inspection. Additionally, the hole pre-reception and side decoration works should be largely finished. The installation of the door frame generally does not require manual completion, so it will not be considered here.
Purpose: These preparatory steps aim to prevent subsequent rework, thereby saving time, manpower and costs.
Second, Assembly:
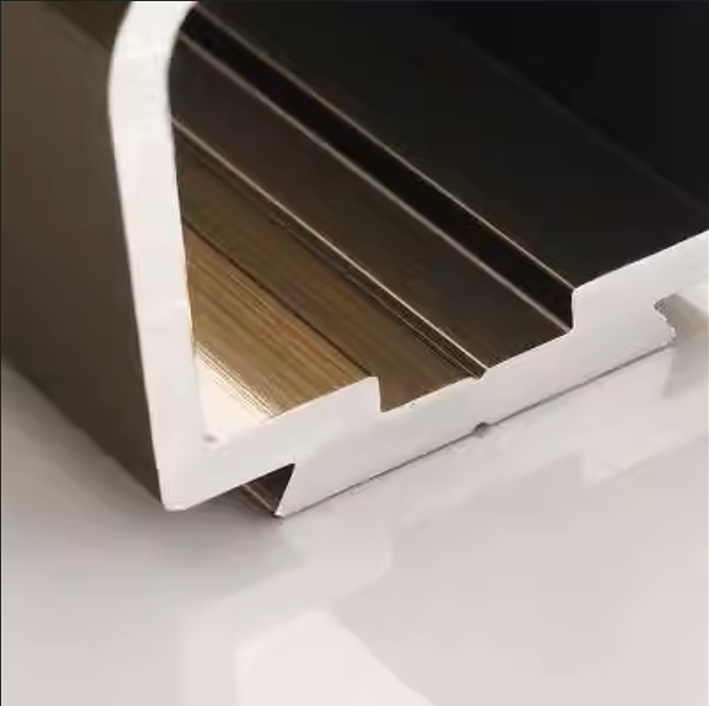
Assemble the track: Insert the pulley into the slot of the top track and install the cover plate.
Install the latch: Fix the latch to the designated position on the top of the door panel.
Hang the door panel and make initial adjustments. Hang the two door panels onto the top track pulleys through the latches.
The key step is to carefully adjust the gaps on both sides to ensure that the vertical, horizontal, and lateral gaps are evenly aligned to achieve overall aesthetic harmony.
Perform the initial horizontal adjustment. Make fine horizontal adjustments to the hung door panels until they meet the installation specifications.
Third, installation of hardware and functional testing:
Install all the accompanying hardware components (such as handles, locks, etc.).
Test operation: Push and pull the door panel repeatedly, observe and ensure:
The opening and closing actions are smooth without any obstruction.
The door panel runs smoothly without tilting, shaking or derailment.
There are no abnormal noises during the sliding process.
Final fixation: After confirming that all functions are normal and the positions are accurate, tighten all bolts and screws.
At this point, the entire installation process of the suspended rail sliding door is completed.
Fourth, steps for installing the suspended rail system:
1) Baseline positioning:
Based on the pre-预留ed baseline, precisely recheck and mark the position of the opening and the installation elevation at the top of the door opening
2) Door opening finishing treatment:
According to the design drawings, perform necessary repairs or finishing work around the door opening to ensure that the joint between the door frame and the wall is smooth and without any gaps after installation.
3) Component inspection:
Before installation, check one by one whether all the components required for Hanging sliding door (top rail, pulley, hanger, bolts, nuts, etc.) are complete and in good condition.
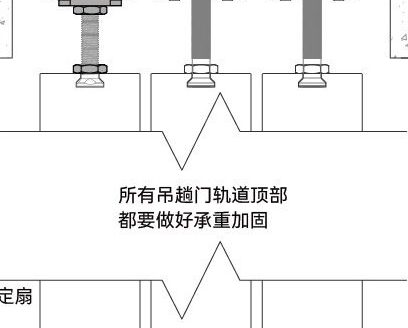
4) Pre-buried part installation:
On the wooden structure (ceiling) at the top of the door opening, 500mm away from the edge of the opening, position and install the pre-buried bolts or anchoring parts (the original text “steel caps”) for fixing the suspended rail, ensuring their firmness and reliability.
Fifth, rail suspension fixation:
a. Place the suspended track at the marked position on the pre-installed top plate.
Make an initial adjustment to the position of the suspended track, and check the levelness, center position and installation dimensions of the suspended track against the drawings and positioning marks.
Use the matching bolts to initially secure the suspended track to the pre-installed plate/top plate.
Key checks: During the installation process and after the initial tightening, make sure to check and confirm that all connection bolts/nuts are correctly installed and have reached the specified tightening torque, and there are no omissions or loosening.
b. Place the top track rollers into the top track in the correct order. Correctly assemble the side frames and horizontal frame, then tighten them using half-length self-tapping screws (ensure the joints are perfectly flush). Important: Pay special attention to the positioning of the top track rollers to avoid rework.
c. Place the assembled door frame into the doorway. First, level and plumb the left and right side frames. Drill positioning holes and secure them with expansion screws (avoid overtightening the screws to allow for minor adjustments during door leaf installation). If the gap is too large, insert thin shims or other suitable material.
Check if the rollers are at the same height and match the site conditions. If they match, you can hang the door leaf. If they don’t match, adjust them to the correct position first and then hang the door leaf. (Note: Ensure the door leaf faces the correct direction).
d. Hang the door leaf. Check if the gap between the two leaves is even from top to bottom. If uneven, make slight adjustments until it’s even. Test the door leaf for levelness, the smoothness of the sliding motion, and the easy, safe operation of the lock. Continue until everything works perfectly. Then, remove the door leaf, securely tighten the positioning wheel screws, rehang the door leaf, and finally tighten the top track roller adjustment screws.
This completes the sliding door installation. Proceed carefully, and you will finish the job efficiently.